
How to Install Pixelmon on Your PC or Server

By James Flarakos | May 14, 2021
How to Install Pixelmon on Your PC or Server easily. From installing the Forge Jar to installing the mods onto a server to play with your friends.
![]()
What is The Pixelmon Mod?
It is a large mod pack consisting of lots of different mods to make a different game play. As the name implies, this will add Pokémon style features to your PC or server.
You able to battle others with your Pokémon, find and battle wild Pokémon in the wild, use the poke shops, Poke health centres and much more.
You also get Biomes o Plenty world generation, so the whole experience is fun and filled with unexpected turns.
Simple Installation Checklist
- Download and Run Forge 1.12.2
- Install the mods to your PC mods Folder
- Install the mods to your Server mods Folder
- Configure Your Generation Settings
Installation Guide
1. Install Forge 1.12.2 for your Launcher
First things first we need to make sure your able to connect to the correct version of Minecraft to be able to use the mods. To get started you will need to download the version of forge that we require to play Pixelmon.
We need Forge 1.12.2 version and the download can be found here. Once downloaded you will need to run it by right clicking the Forge 1.12.2 file and opening with JAVA.
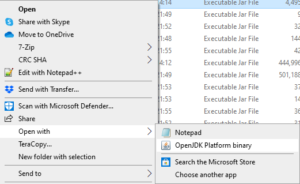
If this option is not coming up for you, you will need to download Java, you can do so by following the link here. Once run, follow the last step and open the Forge file with Java.
On the next screen selected download for client and then follow instructions untill it has downloaded.
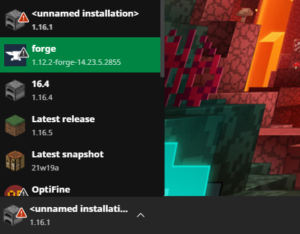
To use this version of forge just log into your Minecraft Launcher and select the version like the picture below.
2. Install The Pixelmon Mods On Your PC
Next up its time to add the mods to your PC so you can play them in single player or join other servers running the same mod.
You can find all the downloads, mods and side mods on the Pixelmon Generations Website. Once on the site you can select downloads and then download the latest release, making sure thats its for 1.12.2.
For Pixelmon side mods just scroll down a bit further on the page and you will find a list of compatible side mods. If you want to use them simply download them also with the main Pixelmon mod.
Now that the Pixelmon mods and side mods are downloaded its time to add them to your PC to get playing. Before we get started just use your launcher to start up a forge 1.12.2 game so that it loads up all the relevant files we need.
To do this use your search bar on your PC and type %appdata% and proceed to open the folder. In this folder you will see another one called .minecraft, open this folder and you will be looking fort another folder called mods.
Once the mods folder is located all you need to do is copy and paste the mods you have just downloaded into the mods folder. Now when you next open up Minecraft on forge 1.12.2 from your Minecraft launcher you will be able to play with all the mods you just downloaded.
3. Install The Pixelmon Mods on Your Server
It is a similar process to get the mods onto your server. to get started you will need to be running a forge 1.12.2 server to be able to support the mods.
To start I suggest deleting all older files in your server to avoid mix ups in mix matched files and folders in the future. We will be using SeekaHost Minecraft Hosting for this example.
So once the old files are deleted, stop the server and change the Jar file on the Multicraft control page. Start the server back up to load up all relevant folders that we will need to insert the mods into.
Like before we will need to download the mods form the Pixelmon Website. Just be aware that any side mods you add to your server will need to be used on the client side too. So any friends that want to connect will not only need the main Pixelmon Generations mod but also the side mods you installed. So download the latest release on the top of the page and/or any side mods.
Stop your server once more and you will find you have a mods folder now created. Much like installing Pixelmon on your pc we will need to upload the mod jar files to our new mod folder.
To do this use your FTP File Access on your SeekaHost Multicraft Control panel, or by using FileZilla. This will be the main Pixelmon Generations mod, and any side mods that you might have downloaded as well.
4. Important Last Step
One step that is overlooked in excitement to get playing is the world generation. Once you installed the Pixelmon Mod you will have noticed its also installed Biomes o Plenty to your mods.
To make sure this works you will need to follow a few more steps before your done. Head to Files and then Config Files and go to Server settings. Navigate down to Level type and change this to CUSTOM.
Save that and then go to your FTP file access, log in and find server.properties. Select edit and then find level type again. Change this to BIOMSOP.
Last step now is to delete any old worlds that may have been generated and start your server.
Pixelmon Installation Guide
Author Profile
- I love to make Minecraft content, and easy quick tutorials for others to use. Contact me on james@seekahost.co for enquiries.
Latest entries
 GamingOctober 13, 2025Boosting Demystified: Solo, Duo, and Power Leveling Explained – How Playhub Helps You Play Smarter
 FortniteAugust 28, 2025Weapon Combos That Dominate in Fortnite
 Minecraft ServersJune 20, 20255 Best Minecraft 1.12.2 Version Servers
 Minecraft ServersJune 20, 20255 Best Minecraft 1.8 Version Servers