
How to Install and Use Essentials Warp GUI Plugin Minecraft Java Edition

By James Flarakos | May 31, 2021
An essential add on for EssentialsX Plugin. With Warp GUI you can improve your server by having a easy Warp Menu come up when players want to use the warps, rather than typing in the whole command.

Essentials Warp GUI Overview
This brilliant little plugin is simple but very effective when trying to run a server and have players have a good experience. Requiring the EssentialsX Plugin to be installed this is an add on feature to one of its many elements. Warp GUI will simplify how players can use the warps. Rather than having to type /warps to find out the names of the individual warps and then manually type /warp (warp name) to travel, you can simply type one command to bring up an easy to use menu.
Although some might think it is un necessary to have a whole plugin just to show a better warp menu i highly disagree. Servers area fine balance of things including how easy everything is to use and understand. This plays quite an important role for when players first join your server as 80% of players that visit brand new servers make their mind up whether they stay or go within the first few minutes.
Having a number of servers my self you can see peoples reaction to a fully functional server with lots of added features that people can sue compared to one with out many features or over complicated ones. Some times spending less than 2 minutes before leaving if everything isnt easy to use or clear. This is why this plugin plays a huge role. For example if you start on a fresh new server and type in /warps and see a menu like the one below your much more likely to use it and investigate.
How ever if you land on my server with out Warp GUI and type /warps. Your going to a long list of names for warps with no description or visual image. Not as tempting and much easier to try another server instead.
How to Install Essentials Warp GUI
- Stop Your Server and Download The Warp GUI Plugin. Make Sure to have EssentialsX Installed First.
- From Your Multicraft Dashboard go to Files, FTP File Access and Log In Using Your Details.
- Open the Plugin Directory and select Upload. Select the Warps GUI Plugin and then Submit.
- Start Your Server Back Up and Your Done.
Configuring Essentials Warp GUI
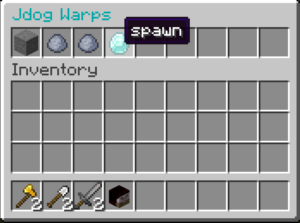
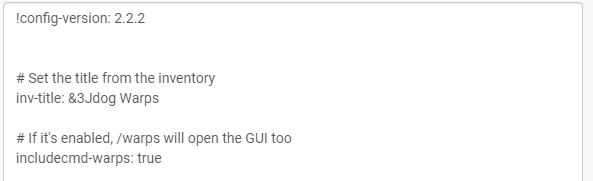
All configuration can be done in game as only required a few commands, one thing you can and may want to change from your main Warp GUI yml file is the name that appears on the top of the warps menu. As you can see in the picture below and above I have changed mine to Jdog Warps rather than warps.
This will require you to set warps before your able to configure any icons, prefixes or Lore’s.
To set a warp using the EssentialsX plugin type /setwarp (followed by a name of the warp you want to create) eg /setwarp spawn. This will create a warp called spawn that players can use to teleport to.
Setting an Icon For Your Warps
To set icons we will be using the main command for this plugin. /warpcfg (followed by the command) For these examples we will be using a warp called spawn. Simply replace the word “spawn” with your warp name to copy over the command.
Type /warpcfg seticon spawn stone – This will set the icon for my spawn Warp on the Menu to a Stone Block.
Adding and Removing a Prefix To Your Warps
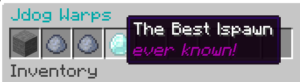
To add a prefix (A message before the warp name) you can do a sepperate command. You can use the colour codes also to make different coloured writing so it doesnt all look the same.
Add Prefix: Type /warpcfg prefix spawn set (Your Message) eg /warpcfg prefix spawn set The Best | if you want your Warps to say “The Best | spawn”
Remove Prefix: Type /warpcfg prefix spawn remove – This will remove the Prefix Completely. Just replace “spawn” with your warp name.

Adding and Removing a Lore’s To Your Warps
Lore’s are messages that come after or underneath the main message. You can sue this to write a description of the warp underneath it or simply add another message after the warp. You can also use the Minecraft colour codes for these messages.
Add Lore: Type /warpcfg lore spawn add (Your Message) eg /warpcfg lore spawn add ever known! if you want it to say “spawn ever known!”
To add multiple lines in the lore just repeat the last step over with another line of wording.
Remove Lore: Type /warpcfg lore spawn remove (line ID) eg //warpcfg lore spawn remove 1. This will remove the top line form my lore. If you want to remove the line under the first line use ID 2 and so on.
Conclusion
We hope this has helped you setup your Warp GUI plugin. Its such an easy to use plugin and although only provided a small feature within the entire server, it provides a good more professional looking one. Not only will it save you type explaining to players how to use warp commands but also will make everyone’s life easier in game as it can be a well used part of many servers.
Author Profile
- I love to make Minecraft content, and easy quick tutorials for others to use. Contact me on james@seekahost.co for enquiries.
Latest entries
 GamingOctober 13, 2025Boosting Demystified: Solo, Duo, and Power Leveling Explained – How Playhub Helps You Play Smarter
 FortniteAugust 28, 2025Weapon Combos That Dominate in Fortnite
 Minecraft ServersJune 20, 20255 Best Minecraft 1.12.2 Version Servers
 Minecraft ServersJune 20, 20255 Best Minecraft 1.8 Version Servers